


Exploring MVU Part 2: Composition
So a couple days have come and gone and I’m still riding high on my experience with the MVU pattern. I’m struggling some with the syntax of F#, but I’m getting it bit by bit and even learning to love some aspects of it. That being said, the sample app I went through last time did nothing but peak my interest. It felt really smooth and easy to reason about, but “Counters” always are, right? So the next logical question is, how do we make this work for a more complicated situation?
I did some digging, but all the examples I could find simply stuffed more code into the view. Which is fine for smaller tasks, but thats just not sustainable for an app with multiple pages and navigation. So I started googling but ended up going in all the wrong directions. Eventually, I came across something in the docs for Elmish (an F# MVU-like framework) that really opened things up. In the example, there’s a Counter module that is used by a CounterList module which reuses the Counter’s model, update, and view logic. I could post the example and we could go through it, but I thought this might be a good chance to make some progress on commutr_v2.
I’m going to start by trying to recreate the first page of the commutr app, which displays all the vehicles that you can track. Now in a future version of this app, we’re going to skip this step if the user has marked a “Primary” vehicle. So really, this work is mostly going to be useless if it ever gets off the ground. But its a good simple case and a good first place to start. My first instinct is to follow the counter example I explained above. So we’ll start with the smallest part first.
VehicleItem.fs
namespace commutr_v2

open Fabulous
open Fabulous.XamarinForms
open Xamarin.Forms

module VehicleItem =
    type Model =
      { Id : int
        Make : string
        Model : string
        Year : int
        IsPrimary : bool }

    type Msg =
        | TogglePrimary of bool

    let init (initModel : Model) = initModel

    let update msg model =
        match msg with
        | TogglePrimary isPrimary -> { model with IsPrimary = isPrimary }

    let view (model: Model) dispatch =
        View.StackLayout(padding = Thickness 20.0, verticalOptions = LayoutOptions.Center, orientation = StackOrientation.Horizontal,
            children = [
                View.Label(text = model.Make, horizontalOptions = LayoutOptions.Center, width=200.0, horizontalTextAlignment=TextAlignment.Center)
                View.Label(text = model.Model, horizontalOptions = LayoutOptions.Center, width=200.0, horizontalTextAlignment=TextAlignment.Center)
            ])
This is pretty straight forward, so I won’t go in too much detail. The plan here is to output a view that can be used as a child of a CollectionView. So we have our model which represents a vehicle, the update which can set whether the vehicle in question is “Primary”, and the view which puts it all together. We may come back to this later, as I’m not entirely sure what actions will need to be handled here and what actions will need to be handled in parent components, but this seems like it handles everything I need for the moment.
Now that we have the smallest piece set up, lets move one step higher.
VehicleListing.fs
module VehicleListing =
type Model = {
Vehicles : VehicleItem.Model list
SelectedVehicle : Option<VehicleItem.Model>
}
type Msg =
| Insert
| Remove
| Modified of int * VehicleItem.Msg
| SelectVehicle of int
let initModel : Model = { Vehicles = [
{Id = 1; Make = "Honda"; Model = "Accord"; Year = 2005; IsPrimary = false}
{Id = 2; Make = "Honda"; Model = "Insight"; Year = 2019; IsPrimary = true}
];
SelectedVehicle = None }
let init() = initModel
let update msg model =
match msg with
| Insert -> model //TODO: Make this do something
| Remove -> model //TODO: Make this do something
| Modified (pos, itemMessage) -> { model with Vehicles = model.Vehicles
|> List.mapi (fun i itemModel ->
if i = pos then
VehicleItem.update itemMessage itemModel
else
itemModel)}
| SelectVehicle pos -> {model with SelectedVehicle = Some(model.Vehicles.Item(pos))}
let view (model : Model) dispatch =
let items = model.Vehicles |> List.mapi(fun pos itemModel ->
VehicleItem.view
itemModel
(fun msg -> dispatch (Modified (pos, msg))))
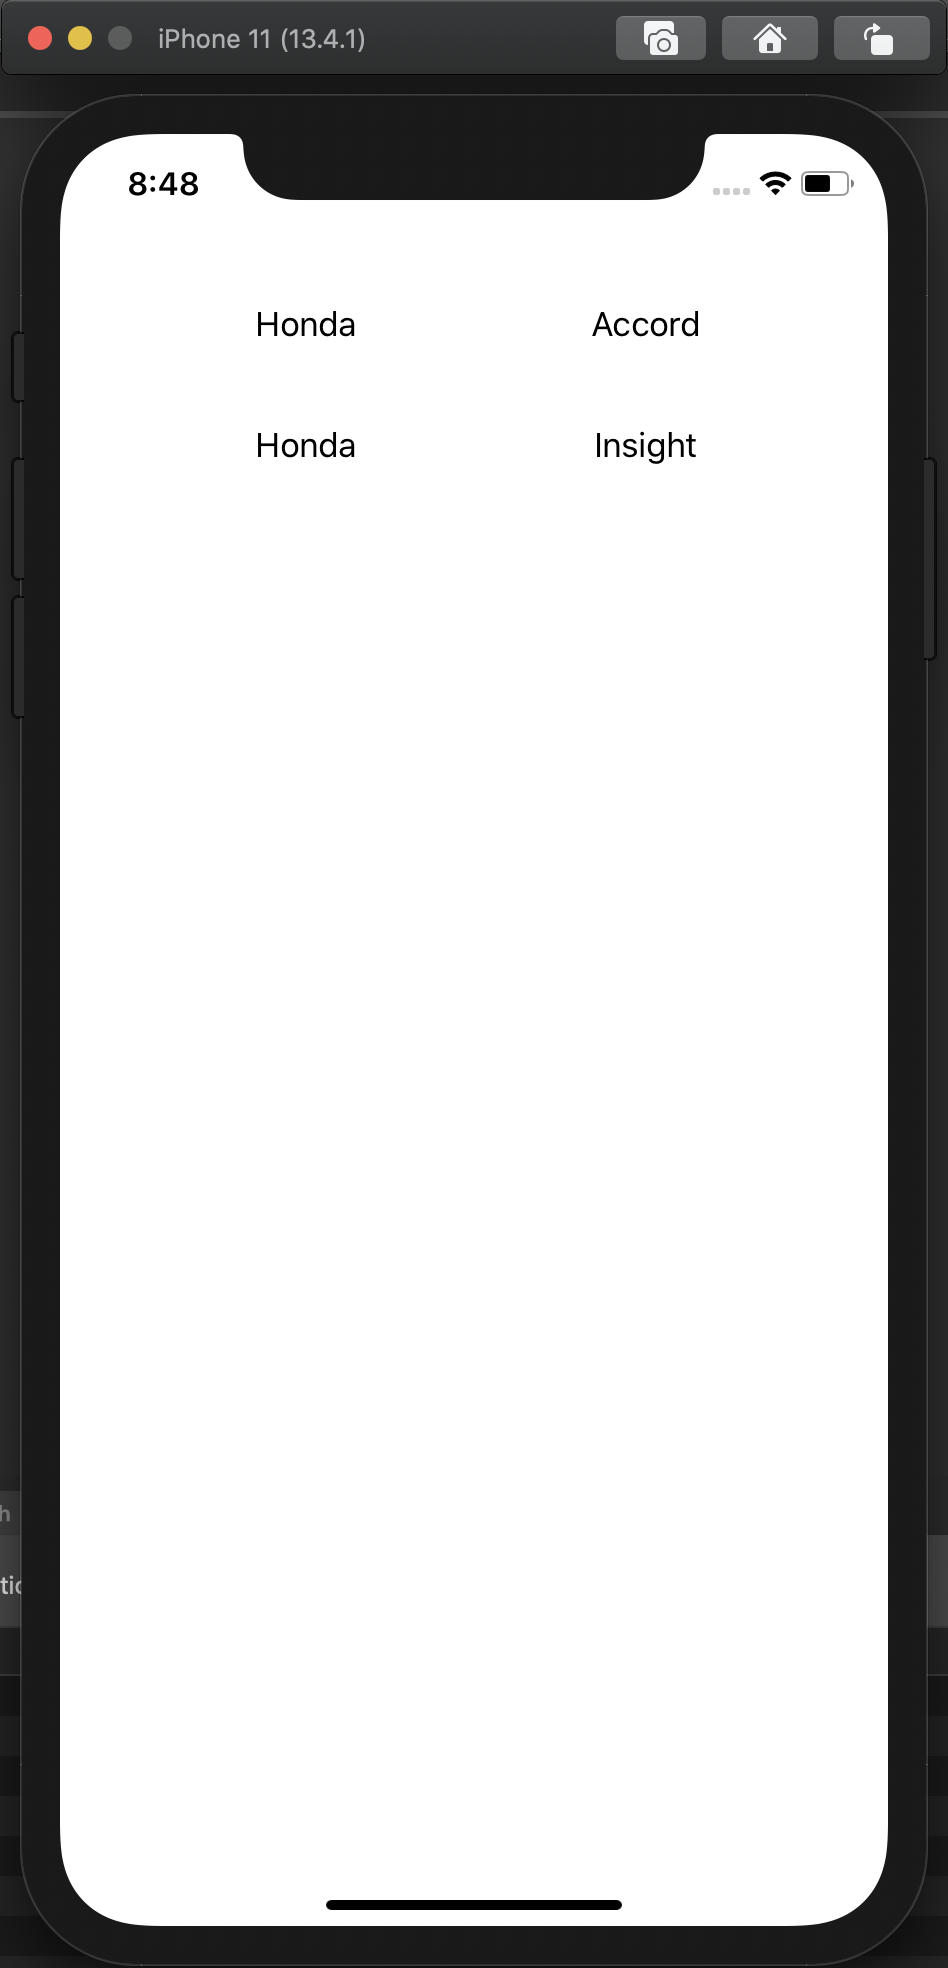
View.CollectionView(items)
Now this is clearly a work in progress, but I wanted to map out where I’m heading while simultaneously getting the most simple case working first. There are three novel things that are happening here. The first is that part of the Model for this module is a list of models from the VehicleItem module. Model, module, model, module… bleh.
Anyway, the second is in update. You’ll notice the arguments for the Modified case are pos (an integer representing the position of the requested item in the array - aka its index) and itemMessage which is of type VehicleItem.Msg. Those arguments are then used to update the model that matches the correct position using VehicleItem.update. So all we’re doing is routing the message back to the appropriate update function so that the result is a list of updated VehicleItem.Models. And since our update functions are pure, we don’t need a specific instance of anything, just pass the model and the message and the result will be the updated model.
The last novel thing is in (you guessed it) the view. We get a list of items by mapping the List of VehicleItem.Model in our model to a list of Stack Layout Views via the VehicleItem.view function. There’s something really interesting that we’re doing here that makes this work. We’re hijacking the dispatch function so that the Modified message gets sent instead. Its then up to our Modified message to update the appropriate item (using VehicleItem.update as we previously saw).
Hopefully that makes sense.
Now, you may notice that I defined a SelectVehicle message that will handle selection (and potentially navigation). I did this mostly just to work out how that might hypothetically look. It isn’t used here because I realized that CollectionView requires you to wrap each item in a SwipeView, so we may have to move that logic down somehow. Or maybe not. I haven’t gotten that far yet.
Back to making the simplest case work.
Wiring It All Up
So now that we have the Vehicle List worked out, lets tie it all together in the root App module.
namespace commutr_v2

open System.Diagnostics
open Fabulous
open Fabulous.XamarinForms
open Fabulous.XamarinForms.LiveUpdate
open Xamarin.Forms

module App =
    type Model =
      { Vehicles : VehicleListing.Model }

    type Msg =
        | VehicleListUpdated of VehicleListing.Msg
        | RefreshVehicles

    let initModel = { Vehicles = VehicleListing.init() }

    let init () = initModel, Cmd.none

    let update msg model =
        match msg with
        | VehicleListUpdated listMsg -> {model with Vehicles = VehicleListing.update listMsg model.Vehicles}, Cmd.none
        | RefreshVehicles -> {model with Vehicles = VehicleListing.init()}, Cmd.none

    let view (model: Model) (dispatch : Dispatch<Msg>) =
        let vehicleList = VehicleListing.view
                            model.Vehicles
                            (fun msg -> dispatch (VehicleListUpdated msg))
        View.ContentPage(
          content = View.StackLayout(padding = Thickness 20.0, verticalOptions = LayoutOptions.Center,
            children = [
                vehicleList
            ]))

    // Note, this declaration is needed if you enable LiveUpdate
    let program = XamarinFormsProgram.mkProgram init update view

type App () as app =
    inherit Application ()

    let runner =
        App.program
#if DEBUG
        |> Program.withConsoleTrace
#endif
        |> XamarinFormsProgram.run app
So this is not all that unsimilar to the VehicleListing. We make the child model part of our model and use the child’s update and view logic in our own. The result isn’t the prettiest, but it displays, so… a job well done?
Clearly there are some changes that need to be made. For instance, not all the vehicle data is displayed and (to be quite frank) this UI is trash. So lets see if we can’t make this thing just a little bit more appealing. The good news is this will likely involve mostly just tweaking the view code a little bit. So lets see what we can do…
We’ll change the view function of the VehicleListing to be the following:
    let view (model: Model) dispatch =
        View.StackLayout
            (padding = Thickness 5.0,
             children =
                 [ View.Frame
                     (hasShadow = false,
                      backgroundColor = AppColors.ghostWhite,
                      padding = Thickness 10.0,
                      content =
                          View.FlexLayout
                              (margin = Thickness 10.0,
                               verticalOptions = LayoutOptions.Center,
                               horizontalOptions = LayoutOptions.Center,
                               alignItems = FlexAlignItems.Center,
                               justifyContent = FlexJustify.SpaceEvenly,
                               direction = FlexDirection.Row,
                               children =
                                   [ View.SKCanvasView
                                       (paintSurface =
                                           (fun args ->
                                               let info = args.Info
                                               let surface = args.Surface
                                               let canvas = surface.Canvas

                                               canvas.Clear()

                                               use paint =
                                                   new SkiaSharp.SKPaint(Style = SkiaSharp.SKPaintStyle.Fill,
                                                                         Color =
                                                                             (if model.IsPrimary then
                                                                                 AppColors.mandarin.ToSKColor()
                                                                              else
                                                                                  AppColors.silverSandLight.ToSKColor()),
                                                                         StrokeWidth = 5.0f)

                                               canvas.DrawCircle
                                                   (float32 (info.Width / 2), float32 (info.Height / 2), 10.0f, paint)))
                                     View.Label(text = model.Year.ToString())
                                     View.Label(text = model.Make)
                                     View.Label(text = model.Model) ])) ])
Now thats quite a big difference, so lets break it down real quick.
The basic layout is a StackLayout with a single Frame as the child. This is done so that we can create space between list elements via padding. The Frame’s content is a FlexLayout which allows us to evenly space the elements horizontally. Finally, we have a dot drawn via SkiaSharp that indicates the which is the primary, along with the reast of the info for the vehicle.
The result looks like this:
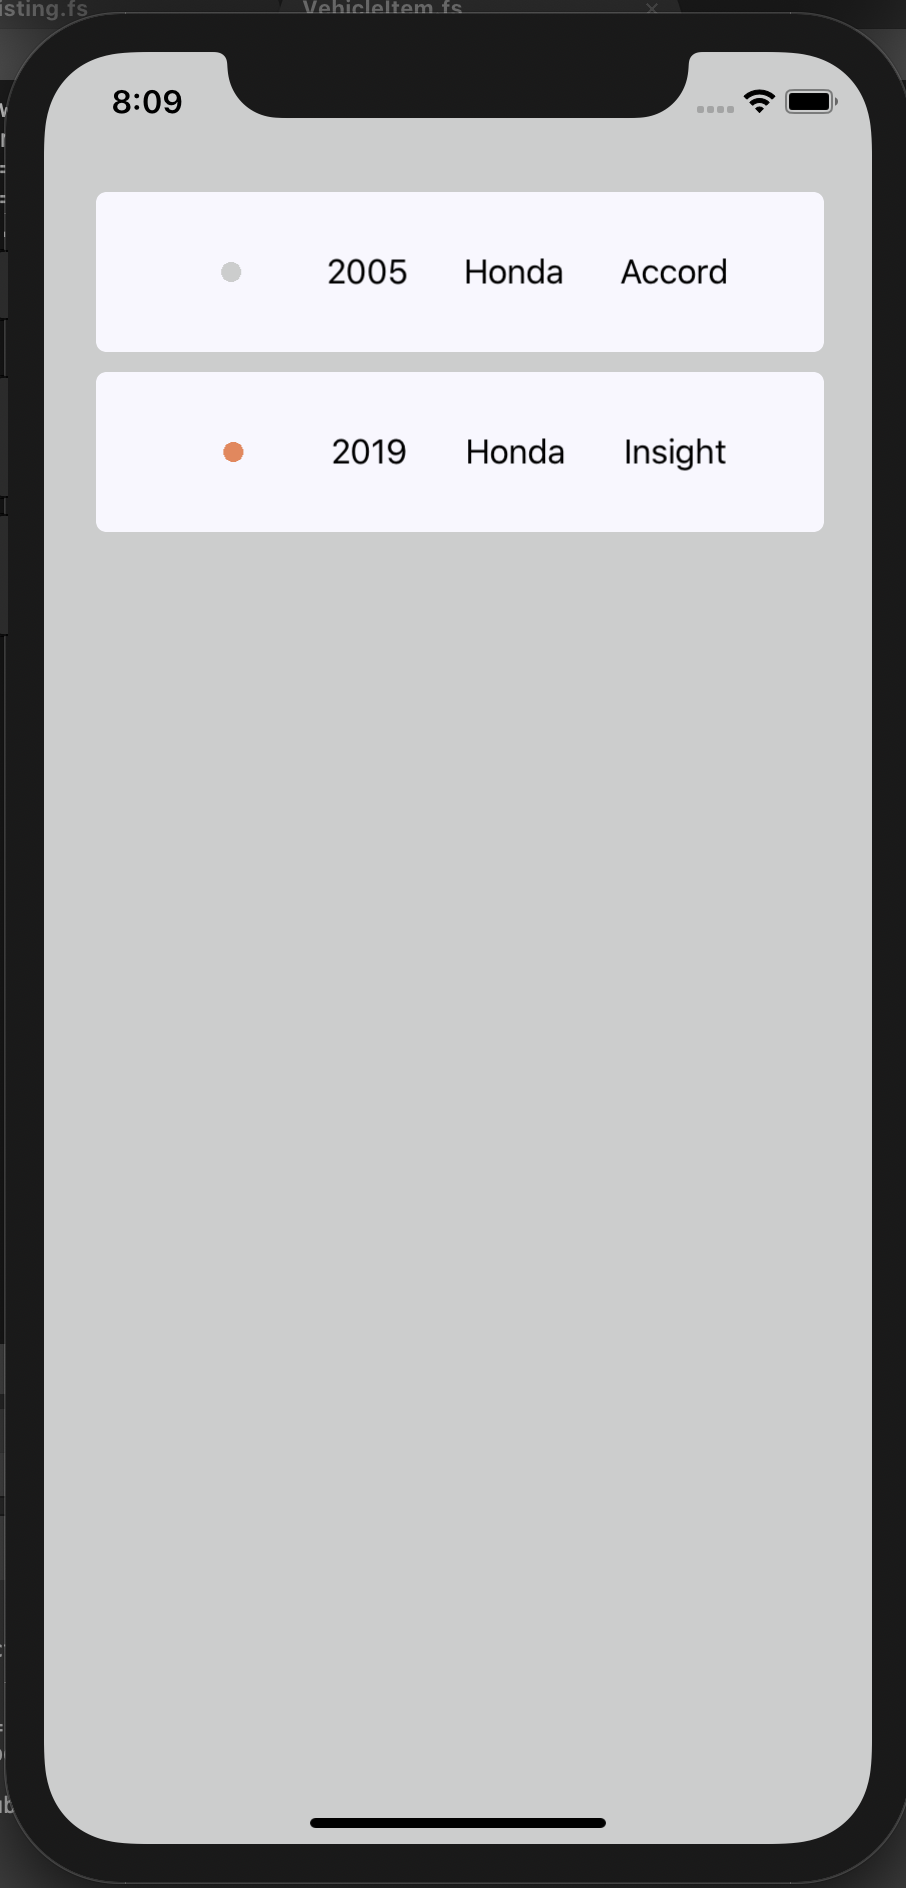
I decided to conditionally change the color of the primary indicator instead of hiding it so that things will continue to line up. The alignment and layout isn’t perfect, but it feels pretty good so I’m going to leave it alone for now and move on to something more interesting. Lets try to wire up a SwipeView so that we can swipe on individual items and mark them as primary.
Toggle Primary
So before we get into the code that changed, I want to say that this was really quite painless to set up. In fact, most of the changes I’ve made were more improvments than they were “making it work”. This is largely due to the nature of MVU. Since I spent a little bit of time mapping out what updates I wanted, the logic required to update the model was already there, it just took a little bit of work to finish putting it together. That being said lets dive in.
    let update msg model =
        match msg with
        | Insert -> model //TODO: Make this do something
        | Remove -> model //TODO: Make this do something
        | Modified (pos, itemMessage) ->
            match itemMessage with
            | VehicleItem.Msg.TogglePrimary isPrimary ->
                { model with
                      Vehicles =
                          model.Vehicles
                          |> List.mapi (fun i itemModel ->
                              if i = pos then
                                  VehicleItem.update itemMessage itemModel
                              else
                                  (if isPrimary && itemModel.IsPrimary
                                   then VehicleItem.update (VehicleItem.TogglePrimary(false)) itemModel
                                   else itemModel)) }
        | SelectVehicle pos ->
            { model with
                  SelectedVehicle = Some(model.Vehicles.Item(pos)) }

    let view (model: Model) dispatch =
        let items =
            model.Vehicles
            |> List.mapi (fun pos itemModel ->
                View.SwipeView
                    (backgroundColor = AppColors.silverSandLight,
                     rightItems =
                         View.SwipeItems
                             (items =
                                 [ View.SwipeItem
                                     (text = (if not itemModel.IsPrimary then "Primary" else "Not Primary"),
                                      backgroundColor =
                                          (if not itemModel.IsPrimary then
                                              AppColors.mandarin
                                           else
                                               AppColors.silverSandMediumDark),
                                      command =
                                          fun () ->
                                              dispatch
                                                  (Modified(pos, VehicleItem.TogglePrimary(not itemModel.IsPrimary)))) ]),
                     content = VehicleItem.view itemModel (fun msg -> dispatch (Modified(pos, msg)))))

        View.CollectionView(items)
Let’s start by looking at the view function. Instead of mapping our VehicleItem.Model’s directly to their view function, we wrap them in a SwipeView. I think it would have also been feasible to implement the swipe view one step down in the body of VehicleItem.view, but it felt right to keep VehicleItem to strictly displaying the Vehicle information.
You’ll notice that the SwipeView contains a SwipeItem which has some conditional rendering of the text and background color. This is just so that we can distinguish between adding and removing the “Primary” status. I used the SwipeItem’s command property to fire dispatch and send the appropriate message. Really and truly, I realized that my Modified message handling is a bit more complicated than it needs to be right now. This is because I’m assuming that VehicleItem will eventually require additional messages (for things like updating the Make, Model) and that that logic will need to be different from the logic that handles IsPrimary.
This is primarily for two different reasons. One is that only one vehicle can have “Primary” status at a time, so if “Primary” status changes for one vehicle, it may affect the others (this is reflected in the update function, but we’ll get to that in a minute). This is simply not true of other properties like Make, Model, and Year.
The second reason is actually not visible in the above code. There is a small change I made to VehicleItem, which basically amounts to forcing SkiaSharp to redraw the little circles on every update. This is fine for right now, because the only reason VehicleItem.update is called at the moment is to change IsPrimary which requires a redraw of the dot. However, as we add other messages, we will need to make sure we don’t redraw on every update as this will result in performance hits.
So this is where we are UI-wise:
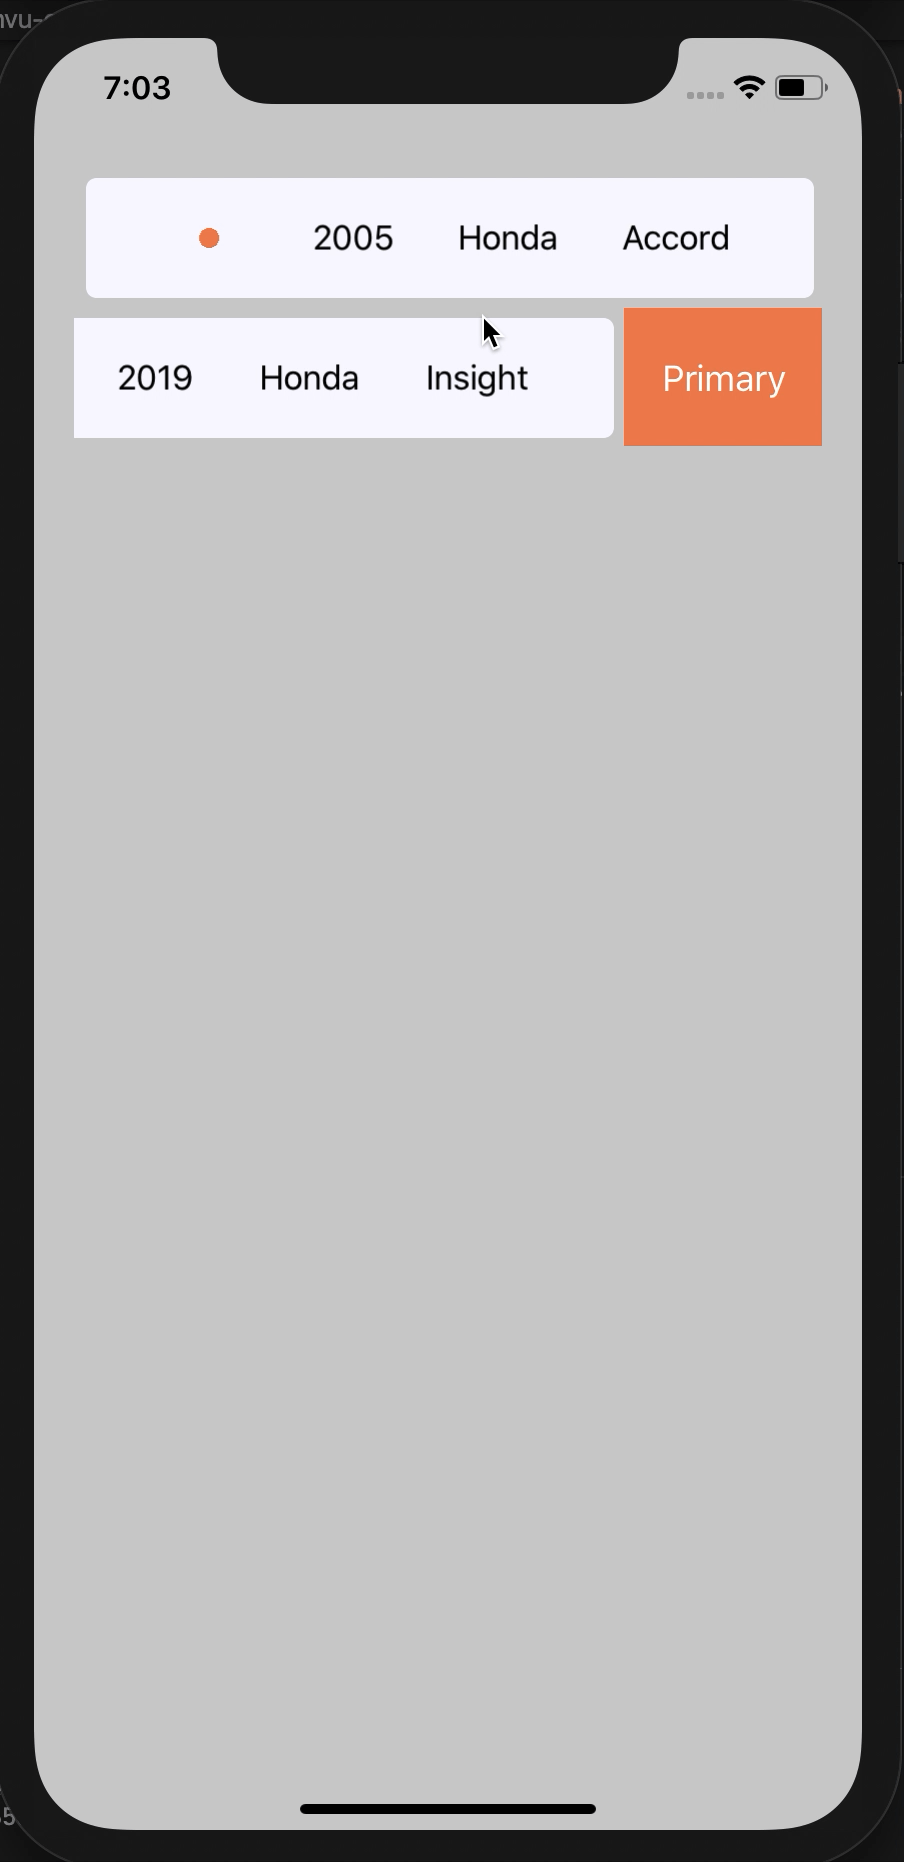
You’ll notice that selecting one as Primary makes the other not primary (if it already was). This logic is handled in our update function. Our Modified message contains the position and the VehicleItem.Msg we want to pass on to VehicleItem.update. Now we could for the time being have made Modified to contain the TogglePrimary message instead of any VehicleItem.Msg, because for now that’s the only message that VehicleItem has, but as I said earlier, this will allow us to handle future scenarios where we want to edit other information. So we pattern match on itemMessage and handle the only existing case (where itemMessage is the TogglePrimary message).
We are also no longer simply calling VehicleItem.update on the item that matches the position we were given. We’re also checking if we’re setting a new item as Primary and mark any other items that are currently “Primary” to false. This will ensure that only one item is ever marked as Primary at a time.
Before we wrap things up, I want to mention that I think this validates my assumption that we can handle “Selecting” a particular vehicle item within VehicleListing. We should be able to call dispatch to send a selection message from a SwipeItem.
Wrapping Up
So I think this is the state I’ll leave the app in for the purposes of this article. I think it gives a pretty good idea of how composition in MVU can allow us to break out parts of the UI into smaller units. So I guess the question is, what did we learn from this?
My first big take away is that this architecture is so straight forward that it was fairly easy for me to do a lot of planning ahead without really having a super great understanding of how all the pieces would fit together. For instance, I was pleasantly surprised by how decisions I made when creating VehicleItem panned out when connecting them to VehicleListing. The simplicity of this framework really does allow you to think clearly and accurately about what changes should and will occur to the model as well as what the resulting UI will look like.
I will note that I did not do any Commanding, which I think will complicate matters when it is needed, but the beautify of this framework is that its not necessary so far, so I didn’t have to use it.
I’d also like to take this time to mention that I did have certain struggles with using additional libraries. One thing I’ve come to realize is that there isn’t a lot of documentation for Fabulous and that examples of F# code in general are hard to find. This can make it difficult to learn, but also frustrating for someone who is used to being able to “just read the docs”.
Another thing I’d like to note is that quite frankly, 3rd party support for F# in Xamarin.Forms basically does not exist. I had wanted to use Sharpnado’s MaterialFrame so I could get the Acrylic look, but quickly found out that MaterialFrame is built to be used strictly in XAML. This was a bit disappointing, but ultimately not a big deal. My hope is that with .NET MAUI, we’ll start to see some of these UI tools become more “Functional Friendly” with built in support that goes beyond data binding and MVVM.
I do plan to continue working on this project, but I think this will be my last blog on it for a while. I need to spend some more time digging in to F# and MVU so that I can really understand it and find some interesting ways to use it, before I can share any more insights.
In the meantime, go give us some listens and feel free to reach out in the comments below, on Twitter @usecasepod, or via email (usecasepod@gmail.com).
You can also find the full repository for this app on our Github, but keep in mind that this is going to be a living project, so what you see in this post today may not be reflected in the current version of the app.